

While Setting up Dual-Write with Project Operations is a no-brainer, often times – setting this up with other applications like D365 Sales needs to take a different route.
If you are using Dynamics 365 Sales and want your Accounts, Contacts and Products to flow to Finance and Operations, Dual-Write is the way to do it. And with the new Power Platform Admin Center experience, you don’t need Lifecycle Services anymore – everything starts from PPAC.
Here’s how I set it up end to end –
1. Create the Sales Environment
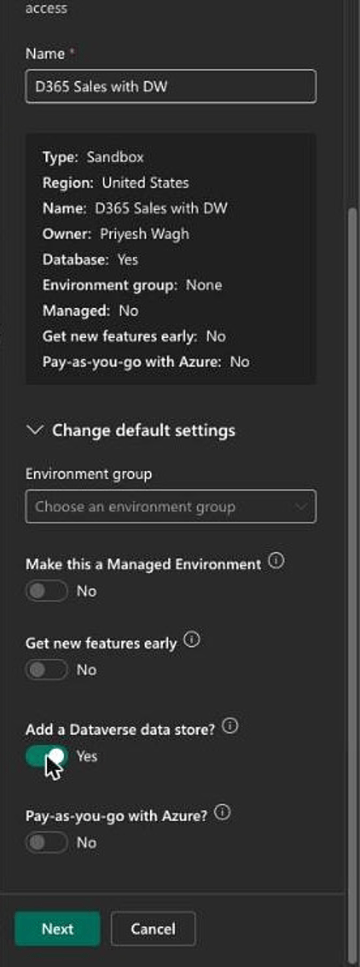
- In Power Platform Admin Center, go to Manage > Environments and click on + New. Give it a Name, select the Type as Sandbox and the Region – I’ve selected United States here. Then, expand Change default settings, set Add a Dataverse data store? to Yes and click Next.

- On the Add Dataverse pane, select the Currency (I’ve chosen USD), Security group as None (since this is a sandbox for demos) and enter a URL of your choice. I’ve given it the same name as the environment. Keep the URL short – the Finance and Operations Provisioning App needs it to be 19 characters or less.

- Now, set Enable Dynamics 365 apps? to Yes and in Automatically deploy these apps, select Sales Enterprise.

- Note: Don’t try to select Sales Enterprise and Finance together here – PPAC doesn’t allow it, you’ll get an error saying the app ‘Finance’ cannot be provisioned with other apps. We’ll add Finance and Operations once Sales is ready.
- Click Save and the environment will start Preparing.

2. Add Finance and Operations to the Sales Environment
Once the Sales environment is Ready, we’ll add Finance and Operations to the same environment. You’ll need to install the Finance and Operations Platform Tools first, and then the Finance and Operations Provisioning App. I’ve covered these steps in detail in this post – Deploying Project Operations Core vs Integrated with ERP.
- First, make sure your Sales environment shows as Ready.

- Open the environment, go to Resources > Dynamics 365 apps and click Install app. Select Dynamics 365 Finance and Operations Platform Tools and click Next. You may see this app listed more than once – any of them works.

- Agree to the terms and click Install. You’ll see a banner that the installation has started.

- Once Platform Tools shows Installed, click Install app again and select Dynamics 365 Finance and Operations Provisioning App (again, you may see it listed more than once). Click Next and confirm – this opens the Provisioning App setup in a new tab.

- On Settings, I’ve ticked Enable Demo Data for Finance and Operations – this gives us sample customers and products to test Dual-Write with. Leave Developer Tools unchecked unless you need them.
- On Version, select the latest version available to you and click Next.
- Review, agree to the terms and click Install. As the screen says, this can take a couple of hours but Dataverse (and your Sales app) stays available during the installation.
- Once the installation completes, the environment page shows a Finance and Operations URL next to the Environment URL. Click it to open Finance and Operations – same environment, same Dataverse as your Sales app.

That’s the environment ready with both Sales and Finance and Operations. In Part 2, we’ll set up Dual-Write and see Accounts from Sales flow into Finance and Operations as Customers.
Hope this was helpful!
Here are some more posts you want to check out –
- Deploying Project Operations Core vs Integrated with ERP
- Environment Groups in Power Platform Admin Center
- Preferred Solution in Dataverse | Power Platform Admin Center
- Enable Copilot for Dynamics 365 Sales environment
And some popular Power Automate posts –
- Select the item based on a key value using Filter Array in Power Automate
- Select values from an array using Select action in a Power Automate Flow
- Call a Flow from Canvas Power App and get back response | Power Platform
- Asynchronous HTTP Response from a Flow | Power Automate
Thank you!