Now Reading: How to Create and Modify a Segment in Customer Insights – Journeys Using the Web API
-
01
How to Create and Modify a Segment in Customer Insights – Journeys Using the Web API
How to Create and Modify a Segment in Customer Insights – Journeys Using the Web API

In this blog, we will walk through the process of creating a new segment in Real-Time Journeys and updating the segment by adding members using the Microsoft Dynamics 365 Web API. (Create a segment-based journey)
A segment is a group of contacts or leads, either dynamically updated or statically defined, that you target in your real-time journey. It helps identify the audience for marketing activities such as emails, SMS, push notifications, and more.
While segments can be created manually through the UI, there are many cases where creating them programmatically using the Web API is far more powerful, especially for developers or integrated systems.
When a user triggers an event, you can instantly add contacts and leads to a specific segment using the Web API—automatically, or you can create a new segment list with no manual intervention. This ensures that the right contacts are included in real-time journeys as soon as the event happens, streamlining the process and keeping everything up-to-date without any extra effort.
Entities Required for Segment Creation
To create a static segment in Real-Time Journeys, you need to create records in the following two essential entities:
- Segment Definition (msdynmkt_segmentdefinitions):
- A segment definition represents a marketing audience or a targeted customer list.
- Include metadata like include members, name, type.
- Segment(msdynmkt_segments):
- This table determines the customer group targeted in Customer Journeys and Real-Time Journeys.
Please find below the steps to create a real-time segment:
1. Call the function: Call the ‘createSegment’ function with ‘recordIds’ as a parameter, where ‘recordIds’ contains the GUIDs of the records you want to add to the segments.
recordIds = “guid1”, “guid2”;// Replace with actual GUIDs
2. Record creation: You have to create the 2 entities records i.e. Segment Definition, Segment entity.
createSegment(recordIds) {

var Seg: any = null

var ML: any = null;

try {

//Segments are used to define and organize target customer lists for marketing campaigns.

ML = new Object();

ML = {

"msdynmkt_name": "New Customers in Last 30 Days",

"msdynmkt_includedmembers": recordIds, //Guid of the records

"statuscode": 723270001, //72327001-Live

"statecode": 0, //0 = Active, 1 = Inactive

}

Xrm.WebApi.createRecord ("msdynmkt_segmentdefinition", ML).then(

function success(result:any) {

//Segment definition record has been created successfully. We will now initiate the creation of a segment entity record.

Seg = new Object();

Seg = {

"msdynmkt_displayname": "New Customers in Last 30 Days",

"msdynmkt_sourcesegmentuid": result.id,

"msdynmkt_type": 11,//10 = Static segment 11 = Dynamic segment

"msdynmkt_source": 12,//12: Customer Insights - Journeys

"msdynmkt_membercount": 3, //length of the contact list

"msdynmkt_baseentitylogicalname":”contact”, //Pass the entity type

}

Xrm.WebApi.createRecord('msdynmkt_segment', Seg).then(

function success(segResult:any) {

if ((segResult.message != undefined)) {

{

//Segment record has been created Successfully

console.log("Segment Created Successfully")

}

}


})

},

function (error:any) {

console.log("Error: " + error.message);

}

}

);

catch (e: any) {

console.log(e.message)            }

}
3. Call Method: The ‘WebApi.createRecord’ method in Dynamics 365 is a client-side JavaScript function used to create new records in the Common Data Service (Dataverse). It is especially handy for dynamically generating records within model-driven apps using JavaScript.
4. Final Output: After creation of the record successfully, the segment record will be created as shown in the screenshot below.
 Note: Currently, you can add only 100 members in the “include members” field of the segment. Update Segment: When working with Real-Time Marketing in Dynamics 365, you may need to update the “Include Members” field of a segment dynamically. Here’s a refined approach to creating a real-time segment.
- Segment ID: Before updating the ‘Include Members’ attribute, obtain the ID (msdynmkt_segmentdefinitionid) of the static segment you intend to change. Use the GET method to fetch the segment details.
- Accounts Data: Have a list of account IDs (GUIDs) to add to the Include Members
Example Account IDs: [ ” a0a59f03-1ebd-ef11-b8e8-6045bde7dfac, a0a59f03-1ebd-ef11-b8e8-6045bde7dfac”]
- Access of the Web API’s: Use the “WebApi.retrieveMultipleRecords” method to fetch the Segment Definition ID (msdynmkt_segmentdefinitionid) of the target segment.
//On update button click you can call this button
async retrieveSegment( segmentdefinationId:any, selectedRecords:any){

var thisObj=this;

// segmentdefinationId- Id of segment definition entity

// selectedRecords- The record you wish to add in the include member for example a0a59f03-1ebd-ef11-b8e8-6045bde7dfac, a0a59f03-1ebd-ef11-b8e8-6045bde7dfac

var tempRecords:any= [];

var fetchXml = "";

fetchXml = "<fetch version='1.0' output-format="xml-platform" mapping='logical' distinct="false">" +

"<entity name="msdynmkt_segmentdefinition">" +

"<attribute name="msdynmkt_segmentdefinitionid" />" +

"<attribute name="msdynmkt_name" />" +

"<attribute name="msdynmkt_includedmembers" />" +

"<attribute name="createdon" />" +

"<order attribute="msdynmkt_name" descending='false' />" +

"<filter type="and">" +

"<condition attribute="msdynmkt_segmentdefinitionid" operator="eq" uiname="New Segment"    uitype="msdynmkt_segmentdefinition" value=""+segmentdefinationId+""/>" +

"</filter>" +

"</entity>" +

"</fetch>" ;


let query: any = '?fetchXml=' + encodeURIComponent(fetchXml)

await Xrm.WebApi.retrieveMultipleRecords("msdynmkt_segmentdefinition", query).then(function (results: any) {


var members: any = results.entities[0].msdynmkt_includedmembers + "," + tempRecords;

var finalmembers = members;

thisObj.updateSegment(finalmembers, results.entities[0].msdynmkt_segmentdefinitionid)

},

function(error:any){

console.log(error.message)

}

)

}


//Update the segment

async updateSegment(response: any, segmentId: any) {

try {

const memberIds = {

"msdynmkt_includedmembers": response // pass the Guids

};

await Xrm.WebApi.updateRecord("msdynmkt_segmentdefinition", segmentId, memberIds)

.then(function (response: any) {

console.log("Segment List Updated Successfully")

},

function (error: any) {

console.log("Error: " + error.message);

}

)

} catch (e: any) {

console.log(e.message)

}

}
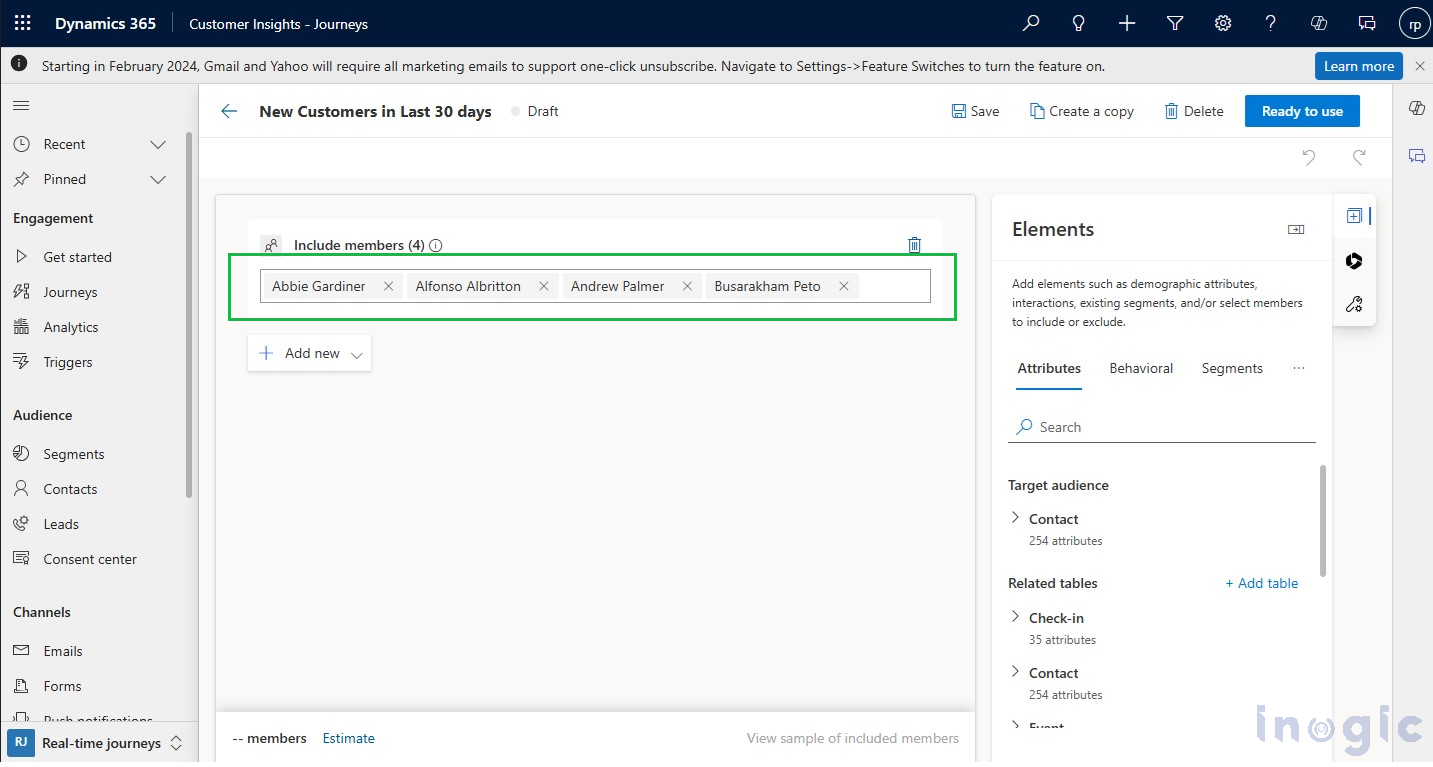
Final Output: After updating the segment, the new members will be added to your existing segment as shown in the screenshot below:
Conclusion
By following these steps, users can effectively manage and utilize real-time marketing segments to drive targeted engagements and personalized campaigns within Microsoft Dynamics 365 CRM. This approach enhances audience segmentation, ensuring marketing efforts reach the right individuals at the right time.
The post How to Create and Modify a Segment in Customer Insights – Journeys Using the Web API first appeared on Microsoft Dynamics 365 CRM Tips and Tricks.
Original Post https://www.inogic.com/blog/2025/05/how-to-create-and-modify-a-segment-in-customer-insights-journeys-using-the-web-api/