

Now Reading: Generate And Send QR Codes For Event Sessions
-
01
Generate And Send QR Codes For Event Sessions

Out of the box, the Event Management functionality includes QR Codes for Event Registrations. What it does not include, is QR Codes for Session Registrations. However, someone can be checked in for a Session. So I wondered if there was a way to generate and send QR Codes for event sessions so someone can be checked in at the door for each session they attend. Well there is, and it isn’t all that difficult to do. Let’s take a look at what is needed to generate and send QR codes for individual event sessions.
First, this is what I want to achieve, an email that can be sent when someone registers for a session and sends them details of the session including their own unique QR code.
First thing I did was dig in to the QR code that is generated for Event registrations. It’s basically a public URL that includes the unique ID of your own organisation among other static values, then the registration ID at the end (with a plus symbol between the first two characters and the rest). The ER stands for event registration. Now if you look at a session registration you will see that those registration ID’s start with SR. And guess what? If you replace the registration ID from an event registration with the registration ID from a session registration, you get a unique QR code that you can use in a custom app to scan and check the person in to the session. Beautiful!
https://public-gbr.mkt.dynamics.com/api/v1.0/orgs/YOUR-UNIQUE-ORG-ID/eventmanagement/qrcode/ER+XKRCP6JXNLDVE3C848MWZP9TPB
But how do we get those QR Codes generated when someone registers for the session? Add a new field to the Session registration table that is single line of text. I would set the length to 200 as I know the URL will definitely be greater than the default of 100. Save it and add to the main session registration form.

It’s your choice, but I also want to see the QR code on the form. I found a great PCF control from Ivan Ficko called URL Image Control. By adding this to the field, it will show the QR Code. Try adding the field on to your form twice initially, one with the control and one without so you can see it working. More on this shortly.

Now we need a flow in Power Automate to run each time a new Session Registration record is created. Start the flow using the Dataverse connector and the trigger for when a row is added. The table is the Session Registrations table.

We just need a couple of steps. The next is an action from the Power Platform for Admins connector. Add the Get Environment as Admin action. In the environment list, click on Enter custom value then add this as the expression. We need this step to find the organisation ID to create the correct URL. I guess you could also hard code it should you choose!
workflow()?['tags']?['environmentName']

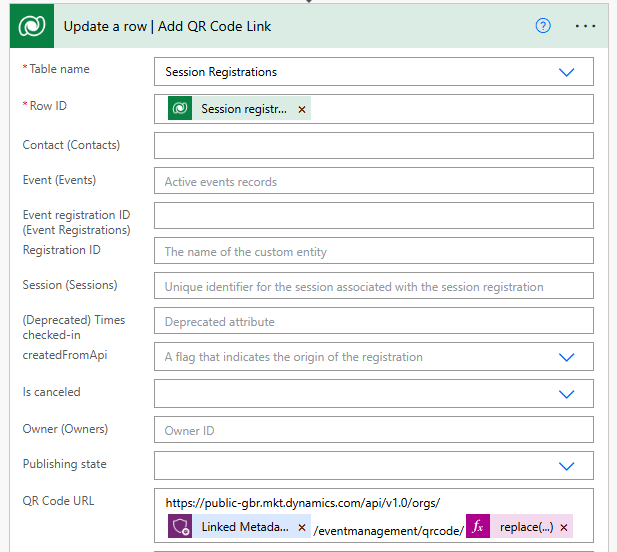
The next step is the Update a row action from the Dataverse trigger and is our last step. We need the Session Registrations table, and use the Session registration unique identifier field in the Row ID. We simply need to use the following to set the QR Code URL. This has all of the static components but also passes through the (strangely named) Linked Metadata Resource ID for the organisation id, then passes through the name field from the Session Registration which is also the Registration ID. Notice that the last part includes replace logic. The Registration ID on the record in the marketing app looks something like this: SR 5HJUJJWSHMEVE4GLGHLS673B9B – but the URL for the QR code needs a plus sign in it like this: SR+5HJUJJWSHMEVE4GLGHLS673B9B. So we will add in the plus as part of the expression. That is it with the flow.
https://public-gbr.mkt.dynamics.com/api/v1.0/orgs/@{outputs('Get_Environment_as_Admin')?['body/properties/linkedEnvironmentMetadata/resourceId']}/eventmanagement/qrcode/@{replace(triggerOutputs()?['body/msevtmgt_name'], ' ', '+')}
Once you create a new Session registration record, the flow should run and populate the QR Code URL field. You can see it below. The field is on the form twice, with the top one just showing the field as is, but the bottom one using the PCF Control from Ivan. There is no need to have the field twice, but if you want to have it just in case, I would suggest making the top one read only, or hide so as to avoid any confusion from your users.

Once all of that is working, you can create your email. I won’t walk through how to create an email for your Session Registrations, but if you want to know how to create a custom trigger, check out this post for details. The part for the QR Code will be added by using an Image and using the insert image from URL option. Simply type {{QRCode}} in to the value and click Insert.

Then click on the Personalise icon on the side panel. The QR Code value will show with a red icon showing that it needs to be mapped. Simply map it to your custom trigger (or whatever trigger you are trying to use) then go through to the Session Registration record and then pick the new QR Code URL field you added. Save it and make your email live so you can use it in a Journey.

Very simple Journey now that fires when my custom Event Session Registration trigger fires then we send out the email.

Now look at that! A beautiful QR Code that can be used to check someone in to the session (assuming you have a custom canvas app you wish to use). Have fun!

Original Post http://meganvwalker.com/generate-and-send-qr-codes-for-event-sessions/


