

Now Reading: Add List Of Session Registrations To Internal Notification Email In Customer Insights
-
01
Add List Of Session Registrations To Internal Notification Email In Customer Insights
Add List Of Session Registrations To Internal Notification Email In Customer Insights

I’ve written previous posts about internal email notifications for marketing form submissions, and how to gather information if it’s related to an Event Registration. This post expands on that and explains how you can also provide information on which sessions the person registered for. By default, each session registered for gets a field submission including the GUID for the session which isn’t all that helpful. Instead, let’s take a look at how you can provide the name of each session in a list of session registrations this using Power Automate.
If you are already sending internal notifications and also allowing people to register for sessions at your events, you might have noticed this. Each session registered for is listed as a different field with the response of on. Not very helpful, but what it does show is the GUID (unique id) of the session so we can do something with this to get the name of the session and display that instead.
If you’ve never created flows in Power Automate before, I wouldn’t recommend this as your first one but engage with your System Administrator or someone with a bit more experience. This is what the end flow looks like. I’ll break down each section in detail for explanation.

First, we want to use the Dataverse connector and make sure the flow only runs when the form submission is successful which is based on the status code changing. When a submission is first created it is Pending, so the change type needs to be modified rather than created. The statuscode needs to be the column that is used to determine when the flow should run and also only run when there is an event registration linked to the record.
(_msdynmkt_eventregistration_value ne null and statuscode eq 575440002)

Next we need to use the initialise variable step twice and create two array variables. One is to combine the regular field submission responses and the other to combine the sessions that were registered for.

Next we will get some details from the related Event Registration record linked to the form submission. The columns you select are up to you depending on what information you want to show on the event. For me, these are the columns from the Event Registration:
msevtmgt_eventregistrationid,_msevtmgt_contactid_value,msevtmgt_name
And using the Expand Query section we can also get values from the related Event and Contact that I will use to generate direct links to the records that can be accessed from the email.
msevtmgt_EventId($select=msevtmgt_eventid,msevtmgt_name),msevtmgt_ContactId($select=fullname)

The next section forms part of the Scope I named Format Submission Information (from the image of the full flow). The first step is a List rows step from the Dataverse connector and is finding all field submissions linked to the form submission. Important to note that the query must exclude any of the field submissions that include msevtmgt_session in the name. This means we are ignoring any that show someone registered for a session. For more information on how to then process these field submissions and add them to a nice table, read through this post for all the fun details. Then come back here to continue on to the session registrations.

Once you’ve reviewed the post and added in your Apply To Each logic for the Field Submissions, we need to add another List Rows step for Field Submissions. This time the filter needs to only include those where the name contains msevtmgt_session. Your condition should also make sure that the form submission id matches the form submission that was successful, the value of the field isn’t null.
    <filter>
      <condition attribute="msdynmkt_marketingformsubmissionid" operator="eq" value="@{triggerOutputs()?['body/msdynmkt_marketingformsubmissionid']}"  />
<condition attribute="msdynmkt_fieldvalue" operator="not-null" />
<condition attribute="msdynmkt_name" operator="like" value="%msevtmgt_session%" />
    </filter>

Then we add in an Apply to each step for each value output from the list rows step. Then add in a Compose step and add this as the formula. We know that the field submission comes through with msevtmgt_session then a colon and then the GUID of the session, so this formula will split up that value and give us everything after the colon (the GUID).
@{last(split(items('For_Each_Session_Submission')?['msdynmkt_localizedfieldname'], ':'))}

Still within the Apply to each section, add in a Get row by ID action from the Dataverse connector. Select the Sessions table, then the Row ID should be the Output of the Compose step above. The only thing you need is the msevtmgt_name field which you can get by showing the advanced options and adding this to the select columns section.

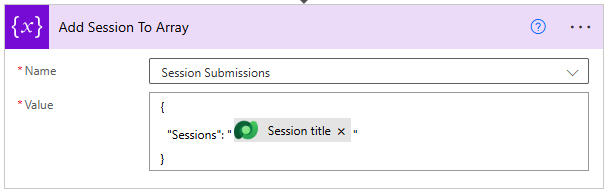
Now you need to use the Append to array variable action and add in to the Session Submissions variable. All we need is the name of the session. Assuming you renamed your Get row by id step to Get Session, you can just copy and past this in to the value section of the append to array step.
{
  "Sessions": "@{outputs('Get_Session')?['body/msevtmgt_name']}"
}
Right that’s it for the Scope of Format Submission Information. Now I have added another Scope to group together the formatting of the data added in to our array variables. You will need to use the Create HTML Table twice. The first one you will add your Field Submissions variable to, and the second one you will add your Session Submissions variable to. The table formatting step isn’t necessary but it can be used to add in some CSS to format how the tables will look. It is a Compose step and you can find more information on the other blog post here. You only need to add the CSS with <style> at the top and </style> at the bottom. Nothing else needs to go here.

The final Scope contains all of the steps to format some record links. Again, more information can be found on the other post.

Finally, you will need to put your email together. You can use the Outlook connector, SendGrid or something else your organisation might have access to. You can put this together however you choose, but if you’ve added the compose step for the CSS for your tables, add this Output at the top of the email. This means any tables in the email will use that styling. Then we need the output from the Create HTML table for the fields then the output from the Create HTML table for the sessions. Then if you are using direct links, they will go towards the bottom.

This is our end result. Two tables broken up in to the regular field submissions, then the sessions that were registered for. Nice and neat with some clean CSS styling and links to the Contact, Event and Event Registration.

Original Post http://meganvwalker.com/list-of-session-registrations-internal/


