

Now Reading: Simple Event Session Check In Canvas App
-
01
Simple Event Session Check In Canvas App

The Customer Insights – Journeys (or Marketing App) has an option to create a new Check-in record, scan a QR code and check someone in to an event. In previous posts I’ve been looking at sessions with the ability to start journeys when people are checked in to a session, and even generate a QR code for a session registration. I thought it might be nice to give you a high level overview of how you could create a simple Event Session Check In Canvas App to use on your phone to scan a QR code and check someone in to a session. Note that I said high level. this is not a Canvas App tutorial so assumes you have some understanding and this isn’t your first app creation. Now let’s jump in!
First, you can do either Tablet or Phone as the format. If you are simply going to scan QR codes and nothing more, the Phone option is probably the one to go with.

Next, add in your data. These are all of the tables you will need to include.

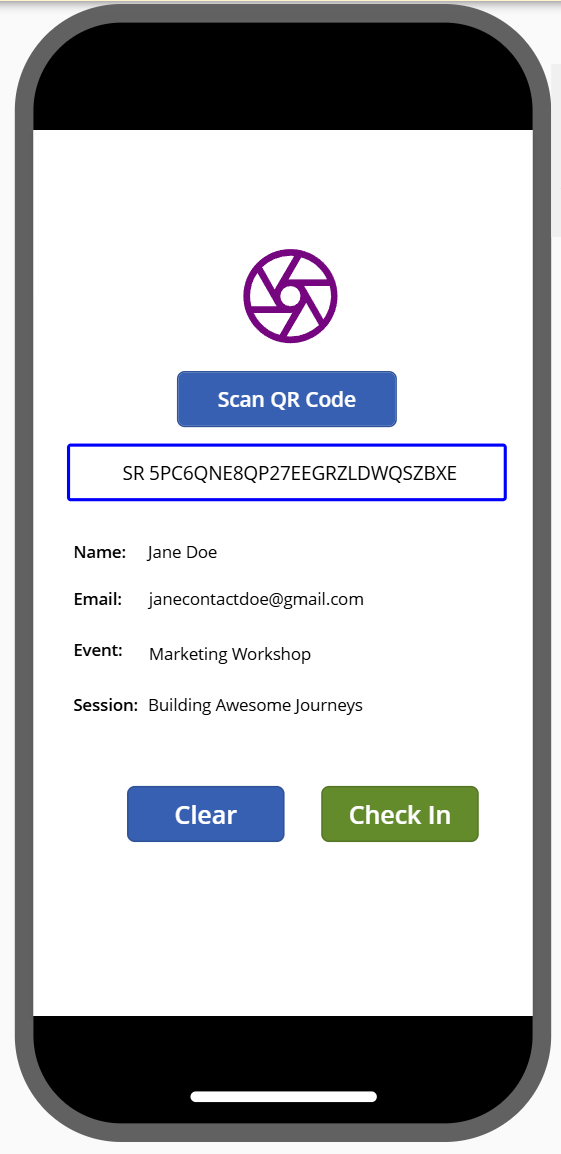
I’m going with two simple screens. The first one will have your barcode scanner, perhaps an icon (just for aesthetics), some labels to show the name of the person, email, event and session they are being checked in for, and a Clear and Check In button.

For the barcode reader, these are the properties I’ve used. Pretty simple.

Now what we need is a bit of logic for the OnScan property. When the QR Code is scanned, we want to update a variable named varScannedItem and populate it with the value that was scanned (which will be the Session Registration ID from the QR Code). I am doing this so that I can set it back to Blank when the person gets checked in later on, meaning you can easily scan again and again without having to remove information. The second line is setting a variable so that we can actually see and use the registration id and also use it to find the right related records. However, the Session Registration ID is stored with a plus between the first two letters and the rest of the string in the QR Code, but with a space on the record in D365. So we are finding the plus and replacing it with a space instead so it doesn’t give us errors.

UpdateContext({varScannedItem: First(Self.Barcodes)});
Set(varRegistration, Substitute(First(BarcodeReader1.Barcodes).Value, "+", " "))
Now I can use the variable I created above of varRegistration and display that in a text box or label.

Now what I want is when the QR Code is scanned, which updates the varRegistration variable and is then displayed in the box, I want to show the name of the person being checked in, along with their email (which I could ask them to confirm), then the name of the Event and the name of the specific Session they are here to attend. To do that, I add a series of labels to display those and the text. I’ve shared the expression for each one. Notice that they all use the varRegistration value as a lookup to find the information via the Session Registration record.
For the Contact Name:
LookUp(
    'Session Registrations',
     'Registration ID' = varRegistration,
    Contact.'Full Name'
)
For the Contact Email:
LookUp(
    'Session Registrations',
     'Registration ID' = varRegistration,
    Contact.Email
)
For the Event Name:
LookUp(
    'Session Registrations',
     'Registration ID' = varRegistration,
    Event.'Event name'
)
For the Session Name:
LookUp(
    'Session Registrations',
     'Registration ID' = varRegistration,
    Session.'Session title'
)
Now I have two buttons. The first one is Clear. This will make the varRegistration value Blank which will clear out the value and remove the details about the person checking in.

Set(varRegistration, Blank());
You can add your other button for the Check In, but more on that in just a second. First, add a new screen and pick the Success one (or create your own from blank).

Now go back to your Check In button, and then go in to the OnSelect. When this button is pressed, we want to make sure it Patches through and creates the Check In record. In my example, I also added in to update the related Session Registration to set the status as Checked In, and add a toggle of Checked In to true using custom fields. So you can see you could do quite a bit with the little app.

Here is everything needed to create the Check In record. All of these are going to be required so make sure you include them all.
Patch('Check-ins',
Defaults('Check-ins'),
{
'Check-in type': 'Check-in type'.'Session check-in',
'Check-in time': Now(),
 Event: LookUp('Session Registrations', 'Registration ID' = varRegistration, Event),
'Event registration': LookUp('Session Registrations', 'Registration ID' = varRegistration, 'Event registration ID'),
'Session attended': LookUp('Session Registrations', 'Registration ID' = varRegistration, Session),
'Session registration': LookUp('Session Registrations', 'Registration ID' = varRegistration),
Attendee: LookUp('Session Registrations', 'Registration ID' = varRegistration, Contact)
});
Below that, we need logic to navigate to our second screen (mine is called screenSuccess) as part of what happens when the Check In button is pressed. I am also passing through the full name of the Contact so I can display it on the success screen. I am also then starting a timer on the next screen.
Navigate(screenSuccess,ScreenTransition.Fade,{AttendeeName: LookUp('Session Registrations', 'Registration ID' = varRegistration, Contact.'Full Name'
)});
Set(startTimer, true);
If you wanted to patch and update the related Session Registration you could do so using something like this in-between the first Patch and the Navigate logic above.
Patch('Session Registrations', LookUp('Session Registrations', 'Registration ID' = varRegistration),
{
'Status reason': 'Status reason (Session Registrations)'.'Checked In',
'Checked In': true
});
Now what we don’t want, is someone trying to check someone in to an event that has already been checked in. D365 will not let you have more than one check in for a registration record (Event or Session). Add a text field on to your first page using red font saying something like “Attendee has already checked in to this session.”. Then go in to the visible attribute for the text box and add this. This will mean the text will only show if there is an existing check in record already.
CountRows(
    Filter('Check-ins','Session registration'.'Registration ID' = lblRegistration.Text)
)> 0
We also only want the Check In button enabled to press when the QR Code has been scanned and has a value, and when there isn’t already a check in record. Notice in my expression below I have a random number in there, which I noticed seemed to be the case when you added the barcode reader initially. So just to be save, I want to ignore it if that somehow makes it’s way back! Let me know in the comments if you know another way around this.
If(IsBlank(lblRegistration.Text) || lblRegistration.Text = "1231412" || CountRows(
    Filter('Check-ins','Session registration'.'Registration ID' = lblRegistration.Text)
)>0, DisplayMode.Disabled, DisplayMode.Edit)
Now on to the second screen. These are all of the components I have on there.

This is my success message, where I can show the name of the person (that I have passed through when the Check In button was pressed) that was checked in to the session.
"Success!
" & AttendeeName & " has been checked in to the session."
On the timer, I have auto start set to true, visible set to false and duration set to 5000. For the OnTimerEnd, I am setting the varScannedItem to blank, varRegistration to blank, startTime to false, and navigating back to the previous screen. This means once you’ve checked someone in, you should be ready to go again to check in the next person.

UpdateContext({varScannedItem:Blank()});
Set(varRegistration, Blank());
Set(startTimer, false);
Navigate(screenScan,ScreenTransition.Fade);
Here you can see it in action!
This shows you my updated fields on the Session Registration record should you choose to.

And this shows the checked in record for the session. Hooray! 

Original Post http://meganvwalker.com/simple-event-session-check-in-canvas-app/


