

Now Reading: Dynamic One Off Marketing Messages For Your Realtime Emails
-
01
Dynamic One Off Marketing Messages For Your Realtime Emails

If you work for yourself or are part of a very small team managing submissions from your Realtime Marketing forms, things come up, holidays or sick leave happen and sometimes you know there could be delays in following up with people who’ve sent a request via one of your forms. Wouldn’t it be great if you had a quick way to add a one time message to your auto responder emails that go out after a form submission is received? Well, for me, YES that is what I wanted. So this post comes from my own need, and the simple one off marketing messages functionality was born. Hope this helps someone out there wanting the same! Take a look and see if it could help you too.
Ok, so first things first, why did I feel like I needed this? Well I have a Realtime Marketing form on my Contact page that has a corresponding Journey. When the form is submitted I send a thank you email back to the Contact including the message they sent me letting them know I will follow up soon. Last year when I had time off over Christmas and New Year, I wanted to inform people that it might be a week or so before they heard from me, then the same when I took 2 weeks off in May for a holiday in Switzerland. My Journey ended up looking like this. The attribute branch would check dates and determine which email to send. It meant editing the journey each time and creating a new email to slot in for the next ‘thing’ that was happening. Messy right?
Instead, I wanted a quick way to have a message be shown without needing branches or different emails. For this I have a new table I called Marketing Message. These are the columns I added.

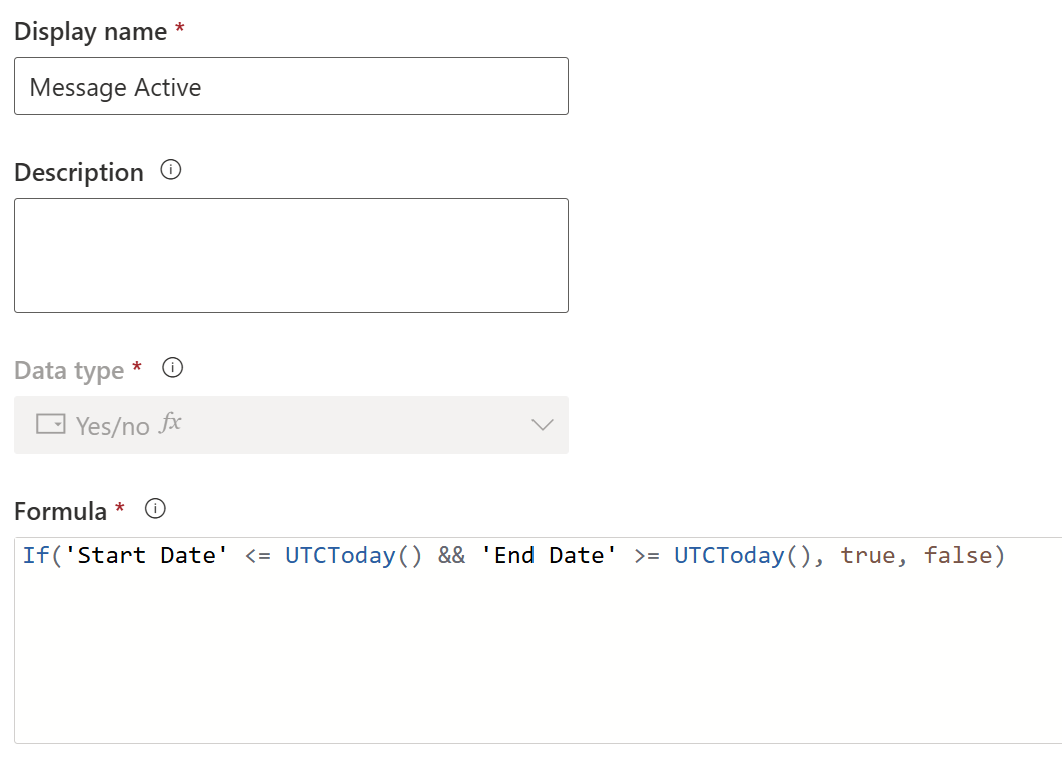
For the Message Active, this is a formula field that sets a value to Yes or No depending on if the message should be displayed or not. This checks the Start Date and End Date fields I created and determines if the timeframe for showing the message has been met. So if the Start Date is earlier than or equal to todays date AND the End Date is greater than or equal to todays date, this is a message that should be set as active so the value of the field will be Yes. Otherwise it will be No. Pretty simple but effective.
If('Start Date' <= UTCToday() && 'End Date' >= UTCToday(), true, false)
Once you’ve added the table and added the fields to your form, be sure to include it in the navigation of the Customer Insights – Journeys (D365 Marketing) app so you can get to it. Then you can add in your new message(s).

So your message list can be as long as you need, just be sure you set the Start Date and End Date so that the Message Active field can be calculated. Below you can see that the first Annual Leave message is active based on the current date of August 29th (at the time of me taking the screenshot).

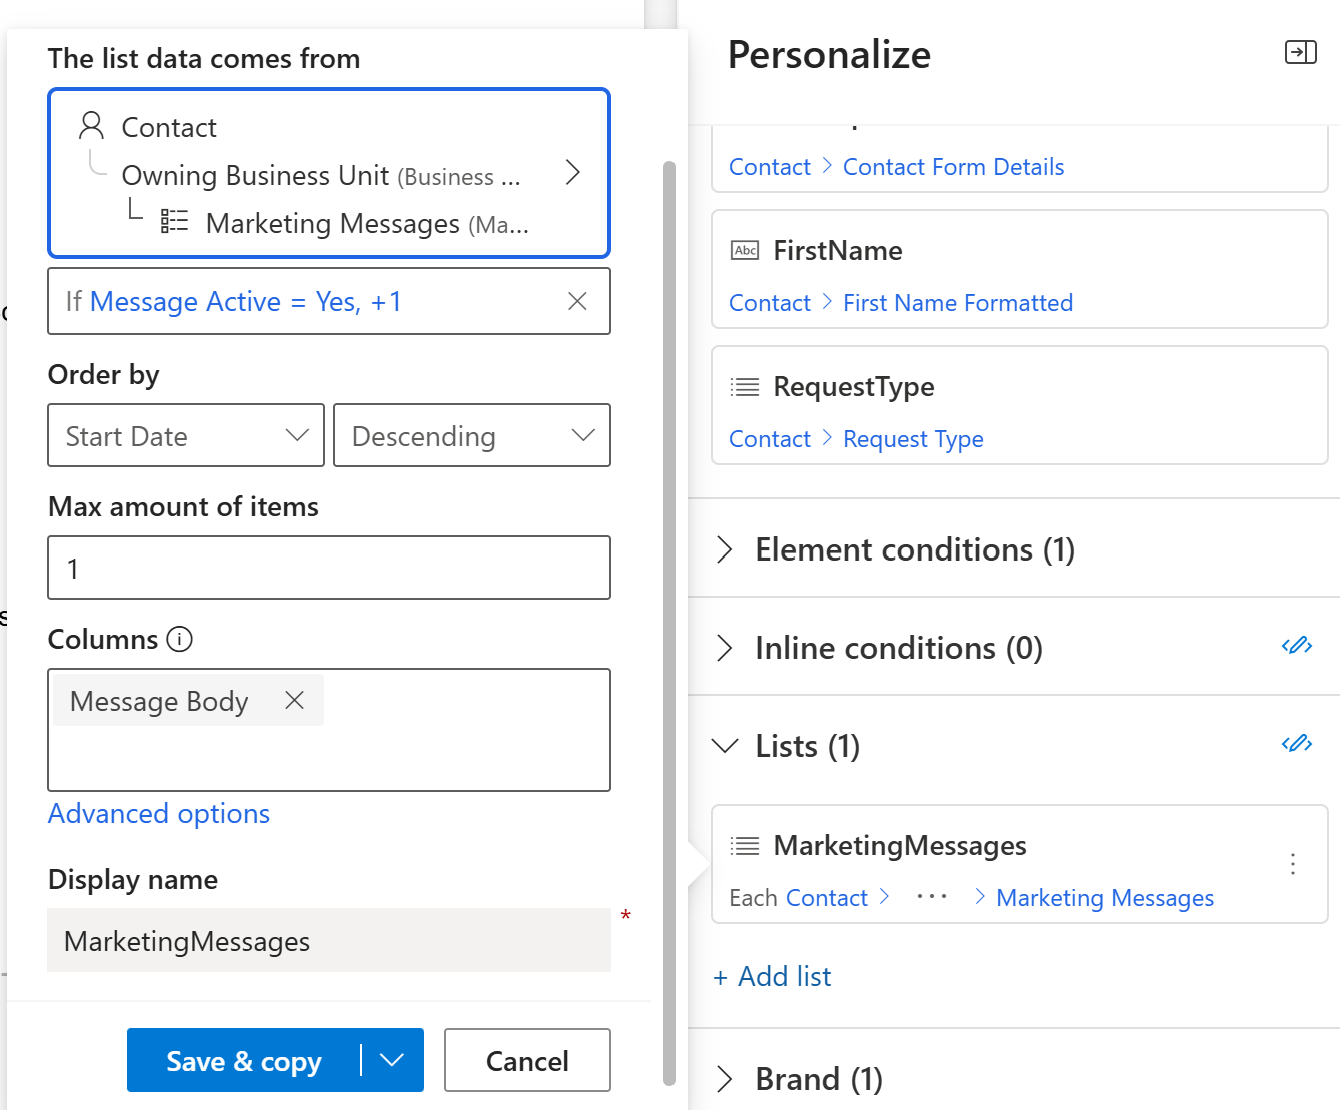
So how do you get that on your emails? This part could be different for your own environment so good to understand your set up first before following along. Every single record in the system, regardless of type (Contact, Lead, Account, Marketing Message etc) is ‘Owned’ by a Business Unit. This is based on the user that Owns the record. For me, it’s simple as I have one Business Unit. That means all Contacts are in the same Business Unit as all of the Marketing Message records I create. For emails I send out that I want to include the messages on, I will add a List in the Personalise section when editing the email. The list will need to come from the Contact, then go to the Owning Business Unit and find the new Marketing Message table you created.

The list needs to be filtered so that the Message Active field should equal Yes. You can add other filtering depending on your own requirements (Status = Active for example) but primarily just make sure you only bring in the ones where the formula field you created based on the Start and End Dates is Active. For the Order by, I would suggest the Start Date Descending (getting the most recent one). The max amount of items can always be more than 1, but if you have multiple messages you want to show, you might want to set a different order field to determine the order in which they would display on the email. The only field you need is the Message Body. Save and Copy to get the code needed to add to your email.
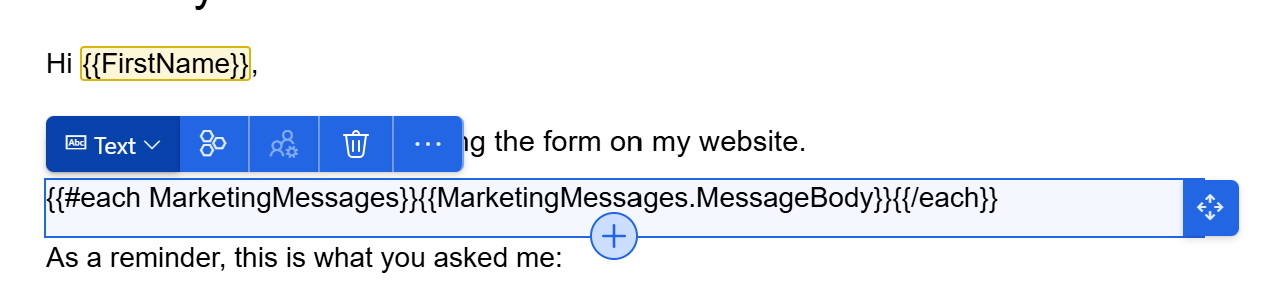
This is what the code should look like (or similar).
You can use the Preview and test tab on the email, then click Edit sample data. From there, simply add in a Contact (any one). This will then use the Owning Business Unit of the Contact, and find any Marketing Message where the Message Active field is Yes and show it on your email. Just simple add a message then make sure one of them is active to see it in preview.

Add your email to your Journey, then go and fill out the form that is linked via the Journey Trigger of Marketing Form Submitted. And there you have it! The dynamic Marketing Message is displayed. One the message is no longer active, the email will just have the normal text included. This makes it so much easier to put a quick message on emails without having to edit them, create a new one or adjust the journey(s) using the email.

Original Post http://meganvwalker.com/dynamic-one-off-marketing-messages-for-emails/


