

Direct your next shot with fal on Microsoft Foundry and ComfyUI

 Microsoft
Nov 06, 2026
Bring the new fal MiniMax H3 Max video model and Foundry image models (gpt-image, FLUX, MAI Image) into ComfyUI with two custom nodes and keyless Microsoft Entra ID authentication, then build a cinematic image-to-video pipeline.
ComfyUI is the node-based canvas many creative teams already use to chain generative models. Microsoft Foundry hosts state-of-the-art image generation models such as gpt-image, FLUX and MAI Image, and starting today, fal video models such as MiniMax H3 Max. This post shows how to bring them into ComfyUI with two small custom nodes. You don’t need a GPU, and you don’t need any API keys.
You will:
- Deploy the models in one Foundry project.
- Give ComfyUI keyless access to Foundry with Microsoft Entra ID.
- Add the Foundry nodes to ComfyUI, step by step. All the code is in this post.
- Build a pipeline that turns a text prompt into a realistic, cinematic 5-second shot.
This post assumes you already have ComfyUI installed and know how to open its UI. It can run on your own Windows, macOS or Linux machine, or on a VM or other compute in Azure.
How it works
The nodes call the Foundry APIs directly. Generation runs in Foundry, and ComfyUI only orchestrates the calls, so a CPU-only machine is enough. The nodes get a Microsoft Entra ID token from the identity already available where ComfyUI runs: your az login sign-in on your own machine, or a managed identity on Azure. There are no API keys to store, rotate or leak in a shared workflow.
Step 1 – Deploy the models in your Foundry project
First, deploy at least one image model and the fal video model to the Foundry resource behind your project. You can deploy them from the Foundry portal or from the command line. Both give the same result.
Option A: Deploy from the Foundry portal
- Open the model catalog in the Foundry portal.
- Find the model. You can filter Inference tasks by Text to image, or search for the model by name.
- Select the model, select Deploy, and keep the default settings.
Option B: Deploy with the Azure CLI
If you prefer the command line, run the following command once for each model, and replace the placeholders with your own values:
az cognitiveservices account deployment create \
 --resource-group <resource-group> \
 --name <foundry-resource> \
 --deployment-name <deployment-name> \
 --model-name <model-name> \
 --model-format <model-format> \
 --model-version <model-version> \
 --sku-name GlobalStandard \
 --sku-capacity <capacity>
Use these values for <model-name> and <model-format>:
| Model | --model-name |
--model-format |
|---|---|---|
| gpt-image | gpt-image-2.5-sunburst |
OpenAI |
| FLUX | FLUX.2-pro |
Black Forest Labs |
| MAI Image | MAI-Image-2.6 |
Microsoft |
| fal MiniMax H3 Max (video) | Fal-MiniMax-H3-Max |
fal.ai |
A few things to keep in mind:
- To find the available
<model-version>, runaz cognitiveservices account list-models -g <resource-group> -n <foundry-resource> --query "[?name=='<model-name>'].version" -o tsv. - Name each image deployment after its model, for example
FLUX.2-pro. The nodes use the name to detect the model family automatically. - The video deployment can have any name. This post uses
minimax-h3.
When you’re done, your project lists all the deployments:
Copy your project endpoint
Finally, copy your project endpoint from the project’s Overview page in the Foundry portal. You need it in Step 3. It looks like https://<foundry-resource>.services.ai.azure.com/api/projects/<project>.
Step 2 – Give ComfyUI keyless access to Foundry
The nodes use DefaultAzureCredential, which picks up whichever Microsoft Entra ID identity is available on the machine that runs ComfyUI. That identity needs the Cognitive Services User role on the Foundry resource. The Foundry User role works too. Follow the section that matches where ComfyUI runs.
If ComfyUI runs on your own machine
In this case, ComfyUI uses your own Azure account through the Azure CLI:
- Install the Azure CLI on the machine that runs ComfyUI.
- Sign in with
az login, as the same OS user that starts ComfyUI. - Grant your account the role on the Foundry resource with these commands:
az login

FOUNDRY_ID=$(az cognitiveservices account show -g <resource-group> -n <foundry-resource> --query id -o tsv)
az role assignment create --assignee-object-id $(az ad signed-in-user show --query id -o tsv) \
 --assignee-principal-type User --role "Cognitive Services User" --scope $FOUNDRY_ID
The role assignment commands use Bash syntax. On Windows, you can run them in Git Bash or in Azure Cloud Shell. Only az login must run on the ComfyUI machine itself.
If ComfyUI runs on Azure compute
In this case, use a managed identity instead of a personal sign-in. Turn on the managed identity of the compute resource, then grant it the same role. For example, on a VM:
az vm identity assign -g <vm-resource-group> -n <vm-name>
PRINCIPAL_ID=$(az vm show -g <vm-resource-group> -n <vm-name> --query identity.principalId -o tsv)
FOUNDRY_ID=$(az cognitiveservices account show -g <resource-group> -n <foundry-resource> --query id -o tsv)

az role assignment create --assignee-object-id $PRINCIPAL_ID \
 --assignee-principal-type ServicePrincipal --role "Cognitive Services User" --scope $FOUNDRY_ID
To create role assignments, you need the Owner or User Access Administrator role on the resource. If you don’t have either, ask your Azure admin to run the
az role assignment createcommand. Role assignments can take a few minutes to propagate. If the first run returns401or403, wait and try again.
Step 3 – Add the Foundry nodes to ComfyUI
A ComfyUI custom node is just a Python folder inside ComfyUI’s custom_nodes folder. ComfyUI loads every folder there when it starts. To add the nodes, you create one folder with two files, install two Python packages, set one environment variable, and restart ComfyUI.
3.1 Find your ComfyUI folder and its Python
| How you installed ComfyUI | Where custom_nodes is |
Python that runs ComfyUI |
|---|---|---|
| ComfyUI Desktop (Windows, macOS) | Select ⋮ on your instance, then Manage → About. Select the installation path to open it. custom_nodes is inside it. |
Use Manage → Terminal, which opens a shell in the instance folder. |
| Windows portable | ComfyUI_windows_portable\ComfyUI\custom_nodes |
ComfyUI_windows_portable\python_embeded\python.exe |
| Manual install (git clone) | ComfyUI/custom_nodes |
The virtual environment you start ComfyUI with, for example ComfyUI/.venv |
Open a terminal in your ComfyUI folder. With a manual install, activate your virtual environment first. Then check that python is ComfyUI’s own Python, not the system one:
python -c "import sys; print(sys.executable)"The printed path must be inside your ComfyUI installation. If it isn’t, use the full path from the table instead of python in the commands below.
3.2 Create the node folder and files
When you’re done, the folder looks like this:
ComfyUI/
└── custom_nodes/
    └── ComfyUI-Foundry/
        ├── __init__.py
└── nodes.py- In
custom_nodes, create a folder namedComfyUI-Foundry. Use File Explorer, Finder ormkdir. - In that folder, create a file named
__init__.pywith this single line. It tells ComfyUI which nodes the folder provides:
from .nodes import NODE_CLASS_MAPPINGS, NODE_DISPLAY_NAME_MAPPINGS- In the same folder, create
nodes.pyand paste the code below.
Use a code editor such as Visual Studio Code. If you use Windows Notepad, set Save as type to All files, or Notepad saves the files as
nodes.py.txtand ComfyUI ignores them.
nodes.py defines two nodes:
| Node | What it calls |
|---|---|
| Foundry Image Generate | The image API that matches the deployment: /openai/v1/images/generations for gpt-image, /providers/blackforestlabs/v1/… for FLUX, and /mai/v1/images/generations for MAI Image |
| fal MiniMax H3 Max Video (Foundry) | /providers/falai/v1/minimax/h3-max/image-to-video, or text-to-video if no image is connected, or reference-to-video if reference images or a reference video are connected. fal jobs are asynchronous, so the node polls until the video is ready, then saves the MP4. |
"""ComfyUI nodes for Microsoft Foundry image models and fal video models on Foundry.
Keyless: DefaultAzureCredential uses your az login sign-in, or a managed identity on Azure."""

import base64, io, os, re, time, uuid

import numpy as np
import requests
import torch
from azure.identity import DefaultAzureCredential
from PIL import Image

import folder_paths

try:
    from comfy_api.input_impl import VideoFromFile
except ImportError:  # older ComfyUI builds without the VIDEO type
    VideoFromFile = None

SCOPE = "https://cognitiveservices.azure.com/.default"
_credential = None


def _auth():
    global _credential
    if _credential is None:
        _credential = DefaultAzureCredential(exclude_interactive_browser_credential=True)
    return {"Authorization": "Bearer " + _credential.get_token(SCOPE).token}


def _base_url(override=""):
    # Accepts a project endpoint (https://<resource>.services.ai.azure.com/api/projects/<project>)
    # or the resource endpoint; model APIs are served from the resource root.
    url = (override or os.environ.get("FOUNDRY_ENDPOINT", "")).strip().rstrip("/")
    if not url:
        raise ValueError("Set the FOUNDRY_ENDPOINT environment variable.")
    return re.sub(r"/api/projects/[^/]+$", "", url)


def _to_tensor(img):
    return torch.from_numpy(np.asarray(img.convert("RGB"), dtype=np.float32) / 255.0)[None, ...]


def _to_data_uri(image, index=0):
    buf = io.BytesIO()
    Image.fromarray((image[index].cpu().numpy() * 255).clip(0, 255).astype(np.uint8)).save(buf, "JPEG", quality=92)
    return "data:image/jpeg;base64," + base64.b64encode(buf.getvalue()).decode()


def _video_to_data_uri(video):
    buf = io.BytesIO()
    video.save_to(buf, format="mp4")  # keeps any trim applied in ComfyUI
    return "data:video/mp4;base64," + base64.b64encode(buf.getvalue()).decode()


FLUX_PATHS = {"flux.2-pro": "flux-2-pro", "flux.2-flex": "flux-2-flex",
              "flux.1-kontext-pro": "flux-kontext-pro", "flux-1.1-pro": "flux-pro-1.1"}


def _family(deployment, family):
    name = deployment.lower()
    if family != "auto":
        return family
    if "flux" in name:
        return "flux"
    if name.startswith(("mai-image", "mai_image")):
        return "mai"
    return "gpt-image"


class FoundryImageGenerate:
    """Text-to-image with a Foundry deployment: gpt-image, FLUX or MAI Image."""

    @classmethod
    def INPUT_TYPES(cls):
        return {
            "required": {
                "prompt": ("STRING", {"multiline": True, "default": ""}),
                "deployment": ("STRING", {"default": "gpt-image-2.5-sunburst"}),
                "size": (["1536x1024", "1024x1024", "1024x1536", "auto"], {"default": "1536x1024"}),
                "quality": (["high", "medium", "low", "auto"], {"default": "high"}),
                "seed": ("INT", {"default": 0, "min": 0, "max": 2**31 - 1}),
            },
            "optional": {
                "model_family": (["auto", "gpt-image", "flux", "mai"], {"default": "auto"}),
                "endpoint": ("STRING", {"default": "", "tooltip": "Empty = FOUNDRY_ENDPOINT"}),
            },
        }

    RETURN_TYPES = ("IMAGE",)
    FUNCTION = "generate"
    CATEGORY = "Microsoft Foundry"

    def generate(self, prompt, deployment, size, quality, seed, model_family="auto", endpoint=""):
        family, base = _family(deployment, model_family), _base_url(endpoint)
        dims = {} if size == "auto" else dict(zip(("width", "height"), map(int, size.split("x"))))
        if family == "flux":
            path = FLUX_PATHS.get(deployment.lower(), "flux-2-pro")
            url = f"{base}/providers/blackforestlabs/v1/{path}?api-version=preview"
            body = {"model": deployment, "prompt": prompt, "seed": seed, "output_format": "png", **dims}
        elif family == "mai":
            url = f"{base}/mai/v1/images/generations"
            body = {"model": deployment, "prompt": prompt, **dims}
        else:
            url = f"{base}/openai/v1/images/generations"
            body = {"model": deployment, "prompt": prompt, "size": size, "quality": quality, "n": 1}

        r = requests.post(url, json=body, headers=_auth(), timeout=300)
        if not r.ok:
            raise RuntimeError(f"{family} image generation failed ({r.status_code}): {r.text[:500]}")
        raw = base64.b64decode(r.json()["data"][0]["b64_json"])
        return (_to_tensor(Image.open(io.BytesIO(raw))),)


class FalH3Video:
    """fal MiniMax H3 Max on Foundry: image-to-video, or text-to-video when no image is connected.
    Connect reference images and/or a reference video to use reference-to-video."""

    @classmethod
    def INPUT_TYPES(cls):
        return {
            "required": {
                "prompt": ("STRING", {"multiline": True, "default": ""}),
                "deployment": ("STRING", {"default": "minimax-h3"}),
                "duration": ("INT", {"default": 5, "min": 1, "max": 10}),
                "resolution": (["768P", "480P", "1080P"], {"default": "768P"}),
            },
            "optional": {
                "image": ("IMAGE",),
                "reference_images": ("IMAGE", {"tooltip": "Image 1, Image 2, ... in batch order"}),
                "reference_video": ("VIDEO", {"tooltip": "Video 1, 2-15 seconds"}),
                "endpoint": ("STRING", {"default": "", "tooltip": "Empty = FOUNDRY_ENDPOINT"}),
            },
        }

    RETURN_TYPES = ("VIDEO", "STRING") if VideoFromFile else ("STRING",)
    RETURN_NAMES = ("video", "path") if VideoFromFile else ("path",)
    FUNCTION = "generate"
    OUTPUT_NODE = True
    CATEGORY = "Microsoft Foundry"

    def generate(self, prompt, deployment, duration, resolution, image=None, endpoint="",
                 reference_images=None, reference_video=None):
        base = _base_url(endpoint) + "/providers/falai/v1/minimax/h3-max"
        body = {"model": deployment, "prompt": prompt, "duration": duration,
                "resolution": resolution, "prompt_expansion_mode": "disabled"}
        route = "text-to-video"
        if image is not None:
            body["image_url"], route = _to_data_uri(image), "image-to-video"
        if reference_images is not None:
            body["reference_image_urls"] = [_to_data_uri(reference_images, i) for i in range(len(reference_images))]
            route = "reference-to-video"
        if reference_video is not None:
            body["reference_video_urls"], route = [_video_to_data_uri(reference_video)], "reference-to-video"

        r = requests.post(f"{base}/{route}", json=body, headers=_auth(), timeout=120)
        if not r.ok:
            raise RuntimeError(f"fal submit failed ({r.status_code}): {r.text[:500]}")
        request_id = r.json()["request_id"]

        deadline = time.time() + 900
        while True:  # fal jobs are async: poll until done
            status = requests.get(f"{base}/requests/{request_id}/status", headers=_auth(), timeout=60).json()
            if status.get("status") == "COMPLETED":
                break
            if status.get("status") in ("FAILED", "CANCELED", "CANCELLED", "ERROR") or time.time() > deadline:
                raise RuntimeError(f"fal request {request_id} did not complete: {status}")
            time.sleep(5)

        result = requests.get(f"{base}/requests/{request_id}", headers=_auth(), timeout=60).json()
        video = requests.get(result["video"]["url"], headers=_auth(), timeout=300)
        video.raise_for_status()
        filename = f"h3_{uuid.uuid4().hex[:8]}.mp4"
        path = os.path.join(folder_paths.get_output_directory(), filename)
        with open(path, "wb") as f:
            f.write(video.content)

        ui = {"images": [{"filename": filename, "subfolder": "", "type": "output"}], "animated": (True,)}
        return {"ui": ui, "result": (VideoFromFile(path), path) if VideoFromFile else (path,)}


NODE_CLASS_MAPPINGS = {"FoundryImageGenerate": FoundryImageGenerate, "FalH3Video": FalH3Video}
NODE_DISPLAY_NAME_MAPPINGS = {"FoundryImageGenerate": "Foundry Image Generate",
                              "FalH3Video": "fal MiniMax H3 Max Video (Foundry)"}
3.3 Install the Python packages
From the terminal you opened in 3.1, install the two packages the nodes need into ComfyUI’s Python:
python -m pip install azure-identity requestsOn the Windows portable build, run this from the ComfyUI_windows_portable folder instead:
python_embeded\python.exe -m pip install azure-identity requests3.4 Point the nodes at your Foundry project
The nodes read your project endpoint from the FOUNDRY_ENDPOINT environment variable. Because the endpoint lives in the environment, it doesn’t end up in workflows you share. Set the variable where ComfyUI starts:
| ComfyUI runs as… | How to set FOUNDRY_ENDPOINT |
|---|---|
| ComfyUI Desktop | Manage → Startup Args → Environment Variables → + Add Variable |
| Windows (portable or manual) | Run setx FOUNDRY_ENDPOINT "https://<foundry-resource>.services.ai.azure.com/api/projects/<project>", then open a new terminal so the variable is picked up. |
| macOS / Linux (manual) | Run export FOUNDRY_ENDPOINT="https://<foundry-resource>.services.ai.azure.com/api/projects/<project>" in the same terminal, before python main.py. |
Linux systemd service |
Run sudo systemctl edit comfyui, add [Service] and Environment=FOUNDRY_ENDPOINT=https://…, then save. |
3.5 Restart ComfyUI and check that the nodes loaded
Restart ComfyUI. ComfyUI only loads custom nodes at startup. In the startup log, which is the console or the Desktop Terminal tab, look for ComfyUI-Foundry under Import times for custom nodes:
If the line says (IMPORT FAILED), scroll up to find the error. No module named 'azure' means the packages went into a different Python, so repeat 3.3 with the full Python path from the table.
Open the ComfyUI UI, or refresh the page if it’s already open, and open the Nodes panel. Both nodes are in the Microsoft Foundry category.
Step 4 – Build a cinematic scene pipeline
Now that the nodes are loaded, you can chain an image model and the video model. The image model creates a cinematic keyframe, and the video model animates it.
Connect the nodes
Add three nodes to the canvas and connect them like this:
- Foundry Image Generate
IMAGE→ Save Imageimages - Foundry Image Generate
IMAGE→ fal MiniMax H3 Max Videoimage
Configure the nodes and prompts
Set the node inputs to these values:
| Node | Setting | Value |
|---|---|---|
| Foundry Image Generate | deployment / size / quality / seed | gpt-image-2.5-sunburst / 1536x1024 / high / 42 (fixed) |
| fal MiniMax H3 Max Video | deployment / duration / resolution | minimax-h3 / 5 / 768P |
In the Foundry Image Generate node, enter a keyframe prompt that sets the look of the shot: lens, lighting and color grade.
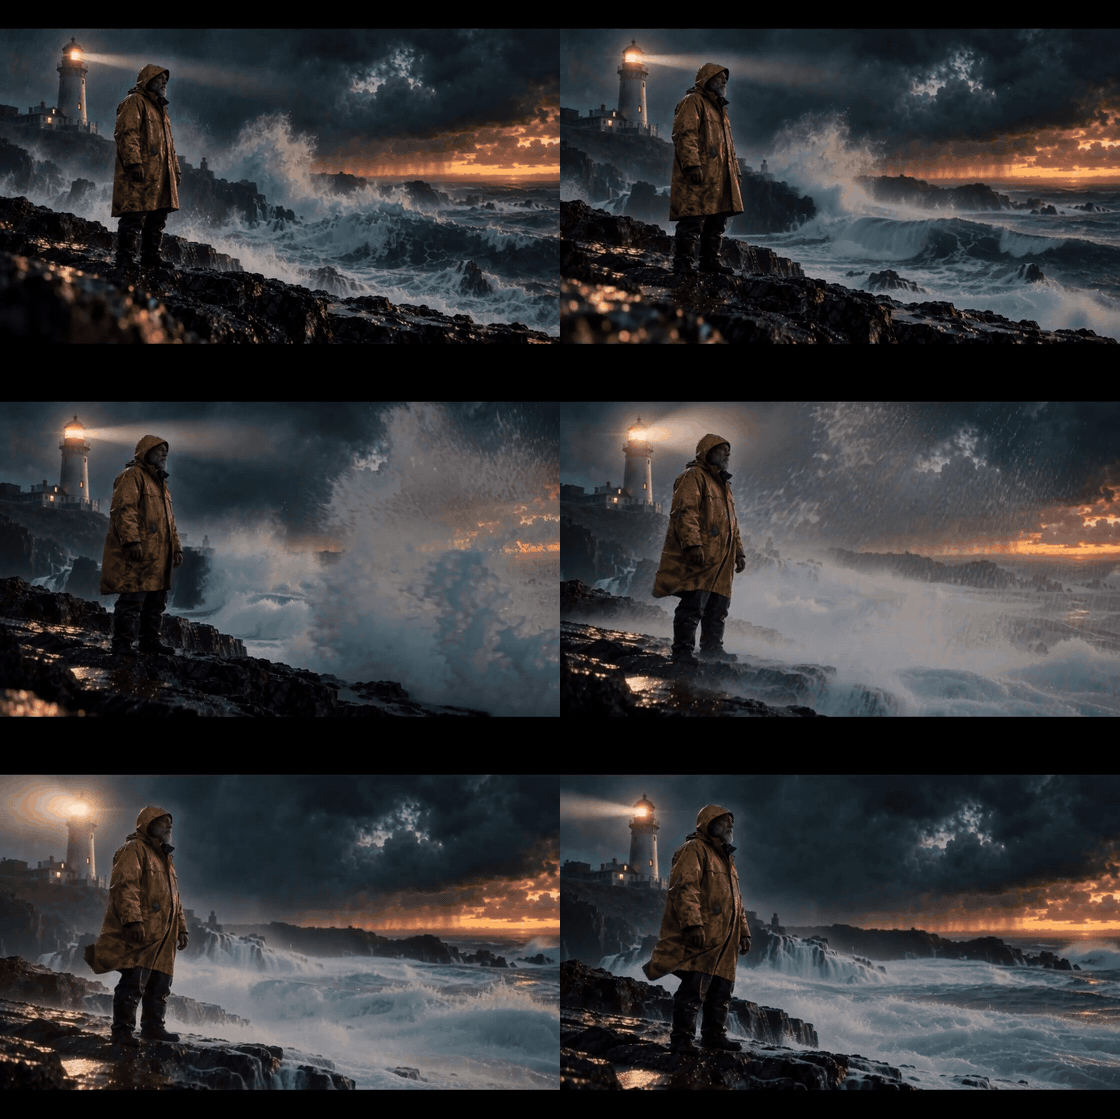
Cinematic film still, shot on 35mm anamorphic lens. A lone lighthouse keeper in a weathered yellow raincoat stands on wet black rocks at dusk, facing a storm rolling in over the ocean. Huge waves crash and throw spray into the air, the lighthouse beam cuts through the rain behind him. Teal and orange color grade, volumetric light, shallow depth of field, subtle film grain, ultra realistic, 2.39:1 framing.
In the fal MiniMax H3 Max Video node, enter a motion prompt. It only needs to describe the camera move and the action, because the keyframe already defines the scene.
Slow cinematic dolly-in toward the lighthouse keeper. The lighthouse beam sweeps through the rain, waves crash against the rocks and spray drifts across the frame, his raincoat flutters in the wind. Subtle handheld camera movement, moody film look, natural motion.
Run the pipeline
Select Run. The keyframe comes back in a few seconds. The fal node then submits an image-to-video job and polls until it finishes. On our run, the whole pipeline took about 80 seconds.
The result
The keyframe from the Foundry image model (1536×1024):
The 5-second, 24 fps shot from fal MiniMax H3 Max:
The image model sets the look (lens, grade, lighting) and the video model only adds motion, so the shot stays consistent from frame to frame. Splitting the work into keyframe → motion is the easiest way to get a realistic, art-directed result.
Tips
- Swap image models. Set
deploymenttogpt-image-2.5-sunburst,FLUX.2-proorMAI-Image-2.6. The node detects the model family from the name and calls the matching API. If your deployment has a custom name, setmodel_familyyourself. MAI Image needs both sides to be at least 768 px. - Use a model from another Foundry resource. Paste that resource’s endpoint into the node’s optional
endpointfield, and grant the same identity (your account or the managed identity) the same role on that resource. - Higher fidelity. Set
resolutionto1080Pon the video node for final renders. - Text-to-video. Leave the fal node’s
imageinput unconnected, and it callstext-to-video. - Iterate cheaply. Keep
seedset tofixed. ComfyUI caches nodes whose inputs haven’t changed, so you can tweak the motion prompt without regenerating the keyframe.
Learn more
- Explore Foundry Models sold directly by Azure
- Foundry Models from partners and community
- Deploy Foundry Models
- Azure OpenAI image generation models
- Deploy and use FLUX models in Foundry
- Deploy and use MAI image models in Foundry
- Configure keyless authentication with Microsoft Entra ID
- Authentication and authorization in Microsoft Foundry
- Role-based access control for Microsoft Foundry
- Sign in with the Azure CLI
- Managed identities for Azure resources
- Configure managed identities on Azure VMs
- Assign Azure roles with the Azure CLI
- DefaultAzureCredential (Azure Identity for Python)
- How to install custom nodes in ComfyUI
- Manage ComfyUI Desktop installations (Terminal, About, environment variables)
- ComfyUI custom nodes docs
Version 1.0
Microsoft