



Over the past few weeks, I had been contemplating how can I bring automation, structure, governance and quality into Power Platform deployments after a conversation with my colleague. Manual exports and imports in Power Platform can slow down delivery and introduce inconsistencies. I wanted to create an automated process that would connect to my Dev environment to GitHub and then to a Test environment — with quality checks in between.
What started as a plausible question quickly turned into a complete CI/CD pipeline journey using GitHub Actions and PowerShell. There were so many learning moments and finally a fully cloud-run pipeline that worked end-to-end:
1. Installing and configuring PAC CLI in cloud runners
2. Managing authentication securely with GitHub secrets
3. Automating imports and exports across environments
4. Adding validation steps to ensure only compliant solutions move forward
The best part? Seeing the pipeline run fully in the cloud, deploying from DEV to Test automatically after passing checks. Every step reminded that automation is not just about being faster — it’s about consistency, discipline and learning to think in systems.
GitHub Repository
If you’d like to explore the full working example — including YAML workflow, folder structure and PowerShell scripts — the repo is available here:
https://github.com/RichaPandit/PowerAppsDeployment
What followed was a learning curve: from pac not recognized errors to authentication challenges and finally a fully cloud-run pipeline that worked end-to-end.
Tools I used
· Power Platform CLI (PAC) — Ensure this is installed in your VS code environment or via the MSI installer
· GitHub Actions
· PowerShell
· Unmanaged Environments (DEV & Test; you can try with managed)
· GitHub Secrets for credentials
The recipe
Here’s a detailed walkthrough covering the setup, YAML pipeline, PowerShell scripting and lessons learned — including the things that didn’t work at first for me.
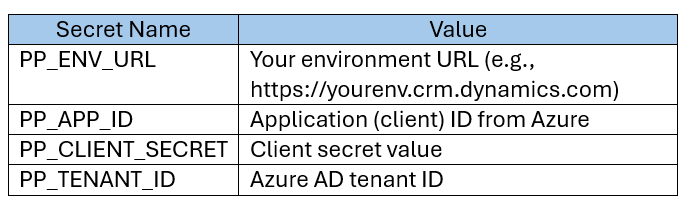
1. Create the Dev and Test environments in Power Platform and ensure you have a Service Principal created as using your own account would require Multi-Factor Authentication (MFA), which cannot be used in CI/CD pipelines with username/password authentication. Once you have the Service Principal created and added as an app user (with System Administrator role) in Power Platform admin, ensure you have all the below details handy.
2. Setting up GitHub Repository
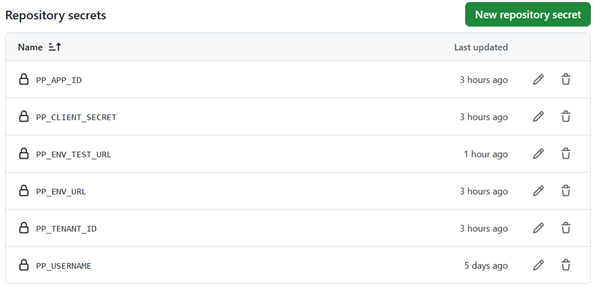
a. Create a new GitHub repo and add environment secrets under Settings -> Secrets and variables -> Actions
b. Under the Secrets tab, click New repository secret and key-in the name and value, and then click Add Secret for below secrets.
3. Configuring the YAML workflow
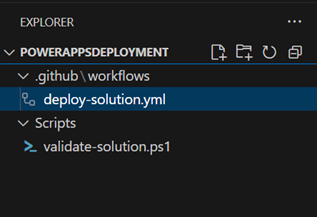
a. Open VS code and create a folder structure with files as shown below.
b. Edit the YAML file to ensure it has steps for:
· Installing the Power Platform CLI via .NET — I tried this with the MSI installer for Power Platform CLI (pac.exe) and Chocolatey, but the MSI often fails silently or installs to a non-standard location (like a user-specific .dotnet tools folder), especially on GitHub-hosted runners. This makes it unreliable for CI/CD pipelines. Additionally, Chocolatey does not currently host a powerplatform-cli package, which is why the installs failed for me. Also, the GitHub Actions for Power Platform failed due to ENOENT Error as it couldn’t find pac.exe because the CLI extraction fails or the path is incorrect.
- name: Install Power Platform CLI via .NET
      shell: pwsh
      run: |
        dotnet tool install --global Microsoft.PowerApps.CLI.Tool
        $env:PATH += ";$env:USERPROFILE\.dotnet\tools"
        pac
· Authenticating with DEV environment
pac auth create - environment $env:PP_ENV_URL `
 - applicationId $env:PP_APP_ID `
 - clientSecret $env:PP_CLIENT_SECRET `
 - tenant $env:PP_TENANT_ID
· Export the solution
pac solution export - name $solutionName - path $exportPath - managed false - overwrite
· Rename exported solution for Test import (This is optional and only required if you want the solution to be named differently in TEST/PROD)
· Download and extract SolutionPackager.exe from NuGet — This step automate the download of SolutionPackager.exe in your GitHub Actions pipeline by pulling it from the official Microsoft NuGet package: Microsoft.CrmSdk.CoreTools.
· Unpack solution before validation — This step creates the .zip file that the validation script later needs to unpack using SolutionPackager.exe.
· Run Best Practice Validation script — I added a PowerShell script that checks basic naming patterns and ensures the right structure before allowing deployment
· Import solution to Test (if the checks are successful) — If validation succeeded, the pipeline automatically deploys the solution to the target environment
4. Trigger the pipeline after committing the local changes.
git add .
git commit -m "Trigger pipeline: test deployment with new filename"
git push origin <branch-name>
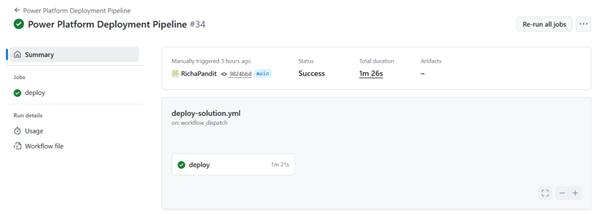
5. You can see the solution in the target environment if all the validations pass successfully.
Lessons Learned!
1. PAC CLI installation paths differ in local vs cloud — use full paths
2. Always authenticate before using any pac commands
3. Secrets management in GitHub Actions is crucial for security
4. Validation scripts can be detailed to include more than just naming conventions
The Road Ahead….
- Integrating Power Apps Code Review Tool in the Review environment
2. Adding custom quality gates for model-driven apps and flows
3. Extending automation with Power Automate and approvals