

Now Reading: Dynamics 365: JavaScript Enabled Button For Box.com Using KingswaySoft And Ribbon Workbench – Part 4
-
01
Dynamics 365: JavaScript Enabled Button For Box.com Using KingswaySoft And Ribbon Workbench – Part 4
Dynamics 365: JavaScript Enabled Button For Box.com Using KingswaySoft And Ribbon Workbench – Part 4

Recently I was tasked with devising a way where our end users could click a button located on an entity form in Dynamics 365 that would launch our Enterprise Box.com file sharing site. This button would be dynamic, driven via JavaScript, and would open the related Box.com folder location that would be dependent upon the entity record the button was initiated from.
In this final post I’ll show you how to take our newly uploaded JavaScript file and attach it to our custom Ribbon Workbench button. Please make sure to test your button in a development environment because once you save it via the Ribbon Workbench tool, it’ll be available for everyone to use. We definitely do not want our end users clicking on a button that may or may not be ready for production. Most times when something doesn’t work, at least in my experience, people tend to write it off without ever trying again.
Series Links Parts 1-4:
- Dynamics 365: JavaScript Enabled Button For Box.com Using KingswaySoft And Ribbon Workbench – Part 1
- Dynamics 365: JavaScript Enabled Button For Box.com Using KingswaySoft And Ribbon Workbench – Part 2
- Dynamics 365: JavaScript Enabled Button For Box.com Using KingswaySoft And Ribbon Workbench – Part 3
- Dynamics 365: JavaScript Enabled Button For Box.com Using KingswaySoft And Ribbon Workbench – Part 4 – Unified Interface Compatibility
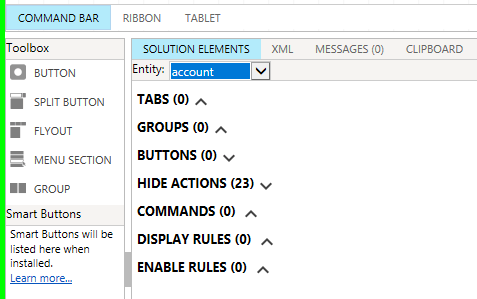
XrmToolKit: Ribbon Workbench Button
Now that we have a viable solution in place to pull our 3rd party cloud storage solution data down into a local staging database and JavaScript to power the button, we can begin working on our new JavaScript enabled button. This button will launch our cloud storage drive in a separate browser window.
First, launch the XrmToolKit application and load of the Ribbon Workbench 2016 plugin with the correct connection to whatever environment you are building this in. Make sure to create a new Dynamics Solution container if you haven’t all ready that contains the entities and the web resources, such as your JavaScript file and icons, that’ you’ll need. Then select the correct entity from the drop-down menu of the Command Bar as shown below. Click, hold, and drag the BUTTON in the Toolbox to the desired location, either Home, SubGrid, or Form. I’ll be working with the account entity throughout this article.
For this example I will be dragging the BUTTON object to the Form section on the account entity. I always want my button visible on the form. In order to make this happen I’ll place the button near the SAVE and NEW buttons. This will keep the button from disappearing as users resize the window. I need to avoid placing it too far to the right where it’ll be hidden away as an overflow item.

Once your button has been placed, fill out the required information for your new button. Give a good descriptive name to differentiate it from other buttons you may have defined on the entity. Definitely provide a good Tool Tip as that will show up when end users place their mouse pointer over your button. Make sure to place icons on your button, 16 and 32 pixel sized icons are needed. The Sequence is important and will change if you move your button object around in the Form section of the entity you’re working with so definitely take some time to play around with that a bit.

XrmToolKit: Ribbon Workbench Command
Now we need to bind our JavaScript code to a new Ribbon Workbench command where in turn we can then bind that to our custom Ribbon Workbench button. While on the same Entity in the Command Bar section, go to Commands and click the + sign and select Add Command.

Next name your new command in the id section, something that you can easily identify in case you are working with many commands. Click the Add Action and then select the Javascript Action as shown below.

Locate the published JavaScript file that we were working on previously. Typing in part of the name will enable the search feature. Then provide the full name to your JavaScript function keeping in mind that this is case sensitive!

Next, we need to add two parameters that’ll be passed to our JavaScript code. Below shows the first parameter. Simply click the Add Parameter and then select CRM Parameter.

For our CRM Parameter we’ll need to select the PrimaryControl. This will provide us with the form context we’ll need to gather information in our JavaScript code.

Next, we need to add a secondary String Parameter for passing in the field name of a lookup to the account record when placing buttons on child related forms. When creating a button for our main Account entity, we’ll leave this field empty.

Account Entity: Below is a picture of what our command should look like for the Account entity reference. We leave the string parameter blank for compatibility with the JavaScript file.

Child Related Entity: Below is a picture of what our command should look like for the related child entity reference. As you can see I have placed in a field name from my environment that is a lookup to the Account entity residing on a related child entity. Keep in mind that the child entity reference below actually needs to be placed on an entity other than the Account entity. I simply wanted to show you what a command would look like when needing to place this on an child entity. Just make sure to select something other than the Account entity when initially creating your button like we did earlier on in this post.

This is what your new command should look like when dealing with a child related entity other than the Account entity.

Finally, we need to bind our command to our button we created earlier. All you need to do is click the drop-down menu on the Command line and select the command you wish to bind too. It also seems that you need to place the entire command name on the CommandCore line. I’m not exactly sure why as it’s not a core command in Dynamics 365 but never the less, it’s been set this way in many examples that I’ve seen on the net.

Once your done you can save and publish your button to Dynamics 365. Make sure to backup your solution first. It may take some time while publishing and will lock out anyone else from also publishing so make sure to communicate with your team. It will be ready for use by your end users immediately when publishing has completed. Just navigate to the entity you placed your button on, or if already there refresh the page, and it should be visible. Make sure to test the buttons functionality by clicking the button to make sure it launches your 3rd party cloud storage solution.

Conclusion

I hope you have enjoyed this series of posts concerning button creation and usage with a 3rd party online cloud storage solution other than Microsoft’s SharePoint product. I mean, sometimes you just need to use tools not built by Microsoft. Hopefully someone will find this useful with other solutions and if so, please do share your links to your posts here.
Series Links Parts 1-4:
-
- Dynamics 365: JavaScript Enabled Button For Box.com Using KingswaySoft And Ribbon Workbench – Part 1
- Dynamics 365: JavaScript Enabled Button For Box.com Using KingswaySoft And Ribbon Workbench – Part 2
- Dynamics 365: JavaScript Enabled Button For Box.com Using KingswaySoft And Ribbon Workbench – Part 3
- Dynamics 365: JavaScript Enabled Button For Box.com Using KingswaySoft And Ribbon Workbench – Part 4 – Unified Interface Compatibility


